
I came across this on DogP’s VB site.
http://www.projectvb.com/tech/carts/flash.html
And I would really like to do this, looks fun and I’ve done it before with a NES cart (Made Baseball game into Earthbound Zero) it was fun! but I don’t have ANY idea about the whole flashing the EPROM chips and such, what do I need to do that? whats the cheapest way?
When I did Earthbound Zero for the NES, I was able to order pre flashed chips online so wasn’t a issue then.
Thanks!
~John
I’d personally get a Willem EPROM programmer, and some 29F040 chips. I recently picked up a GQ-4X from http://www.mcumall.com/ and am really happy with it… all my other programmers have been parallel port programmers, which isn’t as convenient since I do most dev on my laptop now (which doesn’t have a parallel port). I’m sure any of the other Willem programmers from there would be fine too.
You should be able to find the chips in medium quantities for reasonable price on ebay… I’d definitely stick with Flash over EPROMs though, so you don’t have to worry about getting a UV eraser (plus they’re MUCH more convenient).
DogP
Thanks for the advice ^-^
I think I’ll use the flash chips but no mounts, gonna solder them directly in and make a dedicated cart to a rom.
Do you think it’ll fit in a cart without cutting a hole in the cart case?
Umm… it will if you go with surface mount and then get a custom made PCB… I got 2 made for about $40 (flat cost of $25 then $3 per sq inch of PCB), and then my flash chip was $5 or $6, then the voltage regulator was $2 or something, cant remember. I have one board assembled but not tested yet, I don’t have my programmer made yet (got lazy). I have a 16 bit flash chip, so I either need to get a 16 bit flasher or make my own, so I decided to make my own.
The method DogP did was really the easiest and cheapest, even if it does mean cutting up a cartridge.
I really should get back to work on my flasher, but 13 hour days slow me down a bit! Plus it is my first USB project, so I still need to get that part sorted.
I actually have made quite a few just soldering wires directly to the PLCC package, and yeah, it fits without cutting just fine. I think I may have had to thin the case a little bit (scrape away some of the inside of the case with a dremel), but it looked fine on the outside. The PCB is definitely the way to go if you can, but for one or two, it’s not too bad to solder them by hand (after I did a few, it took about an hour to build each).
DogP
DogP, how do you do it, do you have any nice pictures?
If you super glue the PLCC up-side-down and bend out the legs (or cut the bent part off) the profile is less than 3 mm, is that enough? Do you know how much room there is between the PCB and the shell?
I guess it could be good to have a version with sockets also, so you could test the roms in the VB before soldering them in place.
Hey DogP.
Quick question, If I made a cart with re-flash-able chips, and also created the setup you have with the virtual boy cart reader that attaches to a eprom reader to create dumps, would it be possible to not only read from the carts but write to a reprogrammable cart that way as well?
~John
Also what do you use in case of a 2MB Rom file? I saw the reprogrammable setup you have, you say it only has 1MB of storage.
~John
I couldn’t find any pics of any of them, but I just soldered wires directly to the PLCC legs, very similar to the SMT PLCC sockets at the bottom of the page: http://www.projectvb.com/tech/carts/flash.html . And yeah, you could make a dumper and flash them through it if you connected the /WE line to the edge… though that’d be way overkill IMO. That dumper was a huge mess of wires, and not convenient to use at all. If you want a cart with non-removable chips that you can easily reflash, you might as well get a Flashboy or make something similar.
And yeah, the largest flash chip in that package type is 4mbit, so you can only do ROMs up to 1MB. For 2MB you’d need to do an EPROM, or go with a SMT package like SOIC or TSOP.
DogP
For the 2MB games you need enough chips, you could go for four of them. Then you’d have to divide the rom in four parts, lower half odd’s and even bytes and upper half odds and evens and connect the roms appropriately.
I would go for a 27C160 DIP chip instead, less soldering but a little more fuzz when you want to reprogram it as you have to UV-erase them. If you have at least two you could play one and have the other ready to use. Of course it’s one more thing to buy – a UV-eraser… Or you buy enough of the cheaper OTP-chips so that you can burn all the games you like after testing them and have them interchangeable. DIP-capsule chips and sockets can also take a little more wear than PLCC, and are easier to pull from the socket.
eBay usually never fails, here are 10 chips for $38.88:
http://cgi.ebay.com/ws/eBayISAPI.dll?ViewItem&item=390139665426
If you have or get a Willem eprom programmer you need an adapter for this chip however:
http://cgi.ebay.com/ws/eBayISAPI.dll?ViewItem&item=390125722480
There are probably cheaper versions.
I’d go for both of them right away if I had the money (just got unemployed)
EDIT: Addition, plans and datasheet:
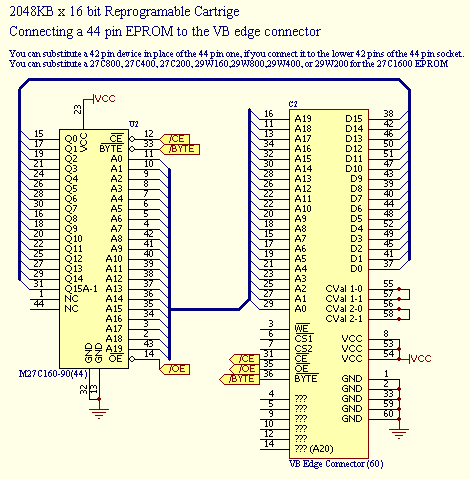
BTW: The size is wrong this is a 1024kB x 16 bit not 2048kB.
The DIP-circuit is however 42 pins, check pinout here:
http://www.alldatasheet.co.kr/datasheet-pdf/pdf_kor/22897/STMICROELECTRONICS/27C160.html
Here’s the most important information:
-
This reply was modified 14 years, 3 months ago by
 e5frog.
-
This reply was modified 14 years, 3 months ago by e5frog.
-
This reply was modified 14 years, 3 months ago by e5frog.
-
This reply was modified 14 years, 3 months ago by e5frog.
-
This reply was modified 14 years, 3 months ago by e5frog.
Attachments:
