

DrWho198 wrote:
These chips can be accessed in 2 modes. the parallel access is the PP mode that is mentioned in the data sheets.
PP mode only has 11 addresses (A0-A10), so I’m assuming it’s sector based as well (similar to a CompactFlash card, which can be many GB, has a parallel interface, but not a purely parallel ROM).
The reason that there are no 8-mbit 32-pin parallel PLCC flash chips is lack of pins… since EPROMs don’t need a /WE pin, they were able to use the additional pin for another address on the 27C080… but a 29F040 is the largest 32-pin parallel flash (1x VCC, 1x GND, 8x data, 19x address, 1x /CE, 1x /OE, 1x /WE = 32 pins). For 8-mbit, you need 20x address lines.
They do make some PLCC-44 x16 flash, but IIRC they don’t have any of the larger chips in that package (like the 29F160 or 29F320). They had basically moved to TSOP by then.
DogP
DrWho198 wrote:
I knew it was a 3.3v, but I think that wouldn’t be too much of a problem.
A 3.3V part will need level shifters, which wouldn’t be necessary if you use one of the many available 5V ROMs. If you run the 3.3V parts at 5V, or connect their non-5V tolerant inputs to 5V pins, they’ll be damaged.
DrWho198 wrote:
I don’t know what the wait state is about. Does that mean that it takes another cycle to read these as they are too slow?
The VB runs at 20MHz, which is a 50ns cycle. There is a register to select whether you have 1 or 2 ROM wait states, so 1 wait state means a ROM access in 100ns (1 cycle + 1 wait), 2 wait states means 150ns (1 cycle + 2 waits). I believe all commercial games used 2 wait states, but some homebrew takes advantage of the extra performance by using faster ROMs and only having 1 wait state.
DrWho198 wrote:
If it technically would be possible in PP mode to use it as flash memory then I guess this one should do the trick:
http://uk.rs-online.com/web/p/flash-memory-chips/7238849/
I didn’t actually look at the other datasheet this morning, but I just checked… neither of these will work, even ignoring the 3.3V problem. You need a standard parallel ROM… those have sector based access.
If you’re only looking to do repros, and want to go with a PLCC package, check out the 27C080 in PLCC. It’s OTP, but works great for games where you don’t need to reburn the chips (I used those and 29F040s on my carts).
Another thing to note… the original PCBs are 0.020″ thick, and PLCC chips are still a bit thick to put inside the shell (I sanded down the tops of mine to keep the cart from bulging).
DogP
Those are 3.3V parts… the VB is a 5V system. I’d also recommend <= 100ns parts so you can run homebrew with 1 wait state (compared to 2 wait states with <= 150ns). DogP
There is no bankswitching. There’s PLENTY of address space… 23 address lines x 16 bits, so 128 mbits for each of the 3 memory spaces accessible on the cart connector (0x07xxxxxx – ROM, 0x07xxxxxx – RAM, and 0x04xxxxxx – Expansion).
If you’re looking to do it yourself, I’ve got the pinout on my site: http://projectvb.com/tech/cartpinout.html , and there are some diagrams here: http://www.goliathindustries.com/vb/VBDiagrams.html . It’s basically just a matter of connecting the address, data, and control lines from the connector to the chips.
For reference, here’s a simple cart PCB I made back in 2005 or so: http://projectvb.com/tech/carts/plccpcb.html . I made a few “repro” style cartridges with that board by simply soldering the chip directly to the board (no socket).
DogP
That sounds exactly like what a typical ribbon cable problem does. If you have soldering skills, you can try soldering it yourself… or if you’re in Europe, you could check with user TheForce81 to see if he’s still offering repairs (IIRC he’s in the Netherlands).
DogP
If you’re looking to make one, I’ve got a couple (sorta) tutorials on my site: http://projectvb.com/tech/carts/eprom.html and http://projectvb.com/tech/carts/flash.html . I wrote them >10 years ago, but for the most part, everything is still the same.
There are basically just two different cartridge types… one with battery backed RAM, the other without.
DogP
Cool… thanks for the info. It sounds like it’s worth at least trying the free version, if even just to give it a quick test drive for fun.
DogP
That sounds really cool… just curious about a couple things. Is this something for a casual user, or is it really aimed at the “professional” (i.e. is it quick and easy to learn, will it help the average VB homebrew programmer, etc)? In the free version, is there anything critical missing for us VB’ers?
What is the “process” to go from drawing to displaying on the VB? Currently, my process is draw (or steal) bmps, convert to 4 colors, then convert to chars and BG maps. Does this program really just accelerate the drawing of animation frames, or are there other optimizations like reducing the number of unique chars, dithering, etc?
Is this program widely used for actual retro game programming (homebrew communities like us), or just “retro” style flash games and stuff. Obviously there are a lot of differences between making something look retro on brand new hardware with practically no limitations, rather than on the old hardware which actually has limitations which forced it to look like that.
DogP
DogP wrote:
I like that they can run at 5V, though I really wish they could do level translation. If they could be a level translator, and perform all those cool functions, I’d have a lot of uses (it’s not clear from the datasheet, but the inputs may be 5V tolerant when run at lower voltages).
BTW, it seems that they’re listening. 🙂 I saw a few months ago that they released their “Dual Supply GreenPAK”. I ordered the kit and played around with it… it’s really cool! The software and dev board are really great to work with. The one thing I didn’t realize is how TINY the chips are. I mean… they’re workable, but certainly not prototyping friendly (20 “pins” in about the size of a 1206 resistor).
I haven’t designed this into anything yet, but definitely plan to give them a try as at least just a cheap tiny level shifter on a future project.
DogP wrote:
And though the parts are cheap, I don’t like that they’re OTP. I’m sure I’d go through a bunch trying to get it just right.
I didn’t catch this the first time I read the datasheet, but while the chips are OTP, they do actually let you configure the chips without burning the NVM… so you can test your circuit in the dev board before burning.
DogP
I saw the news article about the VBDE release, but no corresponding forum post… so I’m assuming discussion is still here?
I’ve been really busy with work, life, other projects, etc… so I’ve been slacking a bit on VB stuff. And I got a new laptop a while back, so getting around to setting up my VB dev environment again has been sorta my barrier to getting back into it. I’m pretty excited to try out this “ready to go” modern gcc on it (I was previously bouncing back and forth between compiler versions).
BTW, in this VBDE release, what’s the status of the various 4.4.2 fixes and outstanding issues that have been discussed?
DogP
I’m planning to go to Too Many Games… hopefully Saturday afternoon (I’m traveling for work next week… I don’t know when I’ll get back yet).
I talked to morintari, and I believe he’s going to try to meet up on Saturday too. Maybe we can all get together for a quick PlanetVB gathering. 🙂
DogP
Yep, the project is definitely still alive. The link shell needs just a couple minor tweaks, but I’m trying to get the redesigned USB link up and running. Just been short on VB time lately.
DogP
Malicedoll79 wrote:
Good evening DOGP
Do you still repair any virtual boy system.?after reading all your miracle work i was wondering if you could do a miracle with mine?it a bad case of glitchy line one one side and also seeing double.hope you can helpmy email malicedoll79@gmail.com
thank you
Sorry… unfortunately, I don’t do repairs anymore. Both RunnerPack (USA) and TheForce81 (Netherlands) offer repairs, and do great work though… so I’d message one of them (depending where you live).
DogP
vb-fan wrote:
PS — where does one get a “fiberglass brush”?
They used to be easy to find (I had gotten them at Radio Shack and the auto parts store)… but in the last few years, it seems that most have either gotten rid of them (or, in the case of Radio Shack – gone out of business), or changed to a nylon bristle brush (still calling them “fiberglass”). The nylon brush is completely useless.
The last one I bought came from an art supply seller on ebay (who I just checked isn’t selling on ebay anymore). But again, you gotta make sure it’s actually fiberglass and not nylon.
DogP
Here’s a video of someone doing a solder repair, to get an idea of what’s involved: https://www.youtube.com/watch?v=RQC4c9Lylg4 .
You can see that the cable is attached the whole time. In that video, he burned away the coating on the cable. I personally don’t like doing that, as it applies too much excess heat IMO. I originally used NaOH, though anymore I use a fiberglass scratch brush to carefully peel back the lamination, leaving the copper exposed.
You can see pics/details in this post: http://www.planetvb.com/modules/newbb/viewtopic.php?post_id=24012#forumpost24012 .
DogP
vb-fan wrote:
So when the displays are “dead” and submitted for repair — the flex cables still have to be dissolved off of the LED pcb’s?
No… when they’re to be soldered, they just need a little bit of the copper of the cable exposed somehow (heat, abrasive, or chemical), so the solder can bridge the connection between the cable and the display. But if you were to use Z-axis tape, you would need to remove the cable from the PCB, since the new tape would have to go between the PCB and the cable.
DogP
We’ve talked about that stuff in the past… I think that’s similar to what they used at the factory (which obviously fails over time).
It could probably be used to fix a VB display, but I think you’d want something to continue applying pressure (bracket and foam or something) to prevent it from coming undone again (the datasheet suggests that, and it seems to work best when you press on it).
The other thing I don’t like is that peeling the cable off the display is a bit risky. It’s very thin and tends to curl, and sometimes leaves copper from the cable attached to the display. I think you’d want to chemically remove the old adhesive, rather than simply peeling. But you’d need to make sure you didn’t get any chemical on the clear window. And then you need to line it back up and re-attach.
So… IMO, it’s an inferior fix to soldering, and not any easier. I have some of the tape, and plan to try it if I ever come across another detached display cable, but haven’t yet. If you give it a try, I’d certainly be interested in how it works out.
DogP
He’s probably referring to the Dragon Hopper that was on half.com . I’m assuming someone put it up as a joke or something… AFAIK, it’s always been listed as “out of stock”.
DogP
Pins 1 and 6 are numbered on the motherboard… it’s the black board sticking up on the right side of this pic:
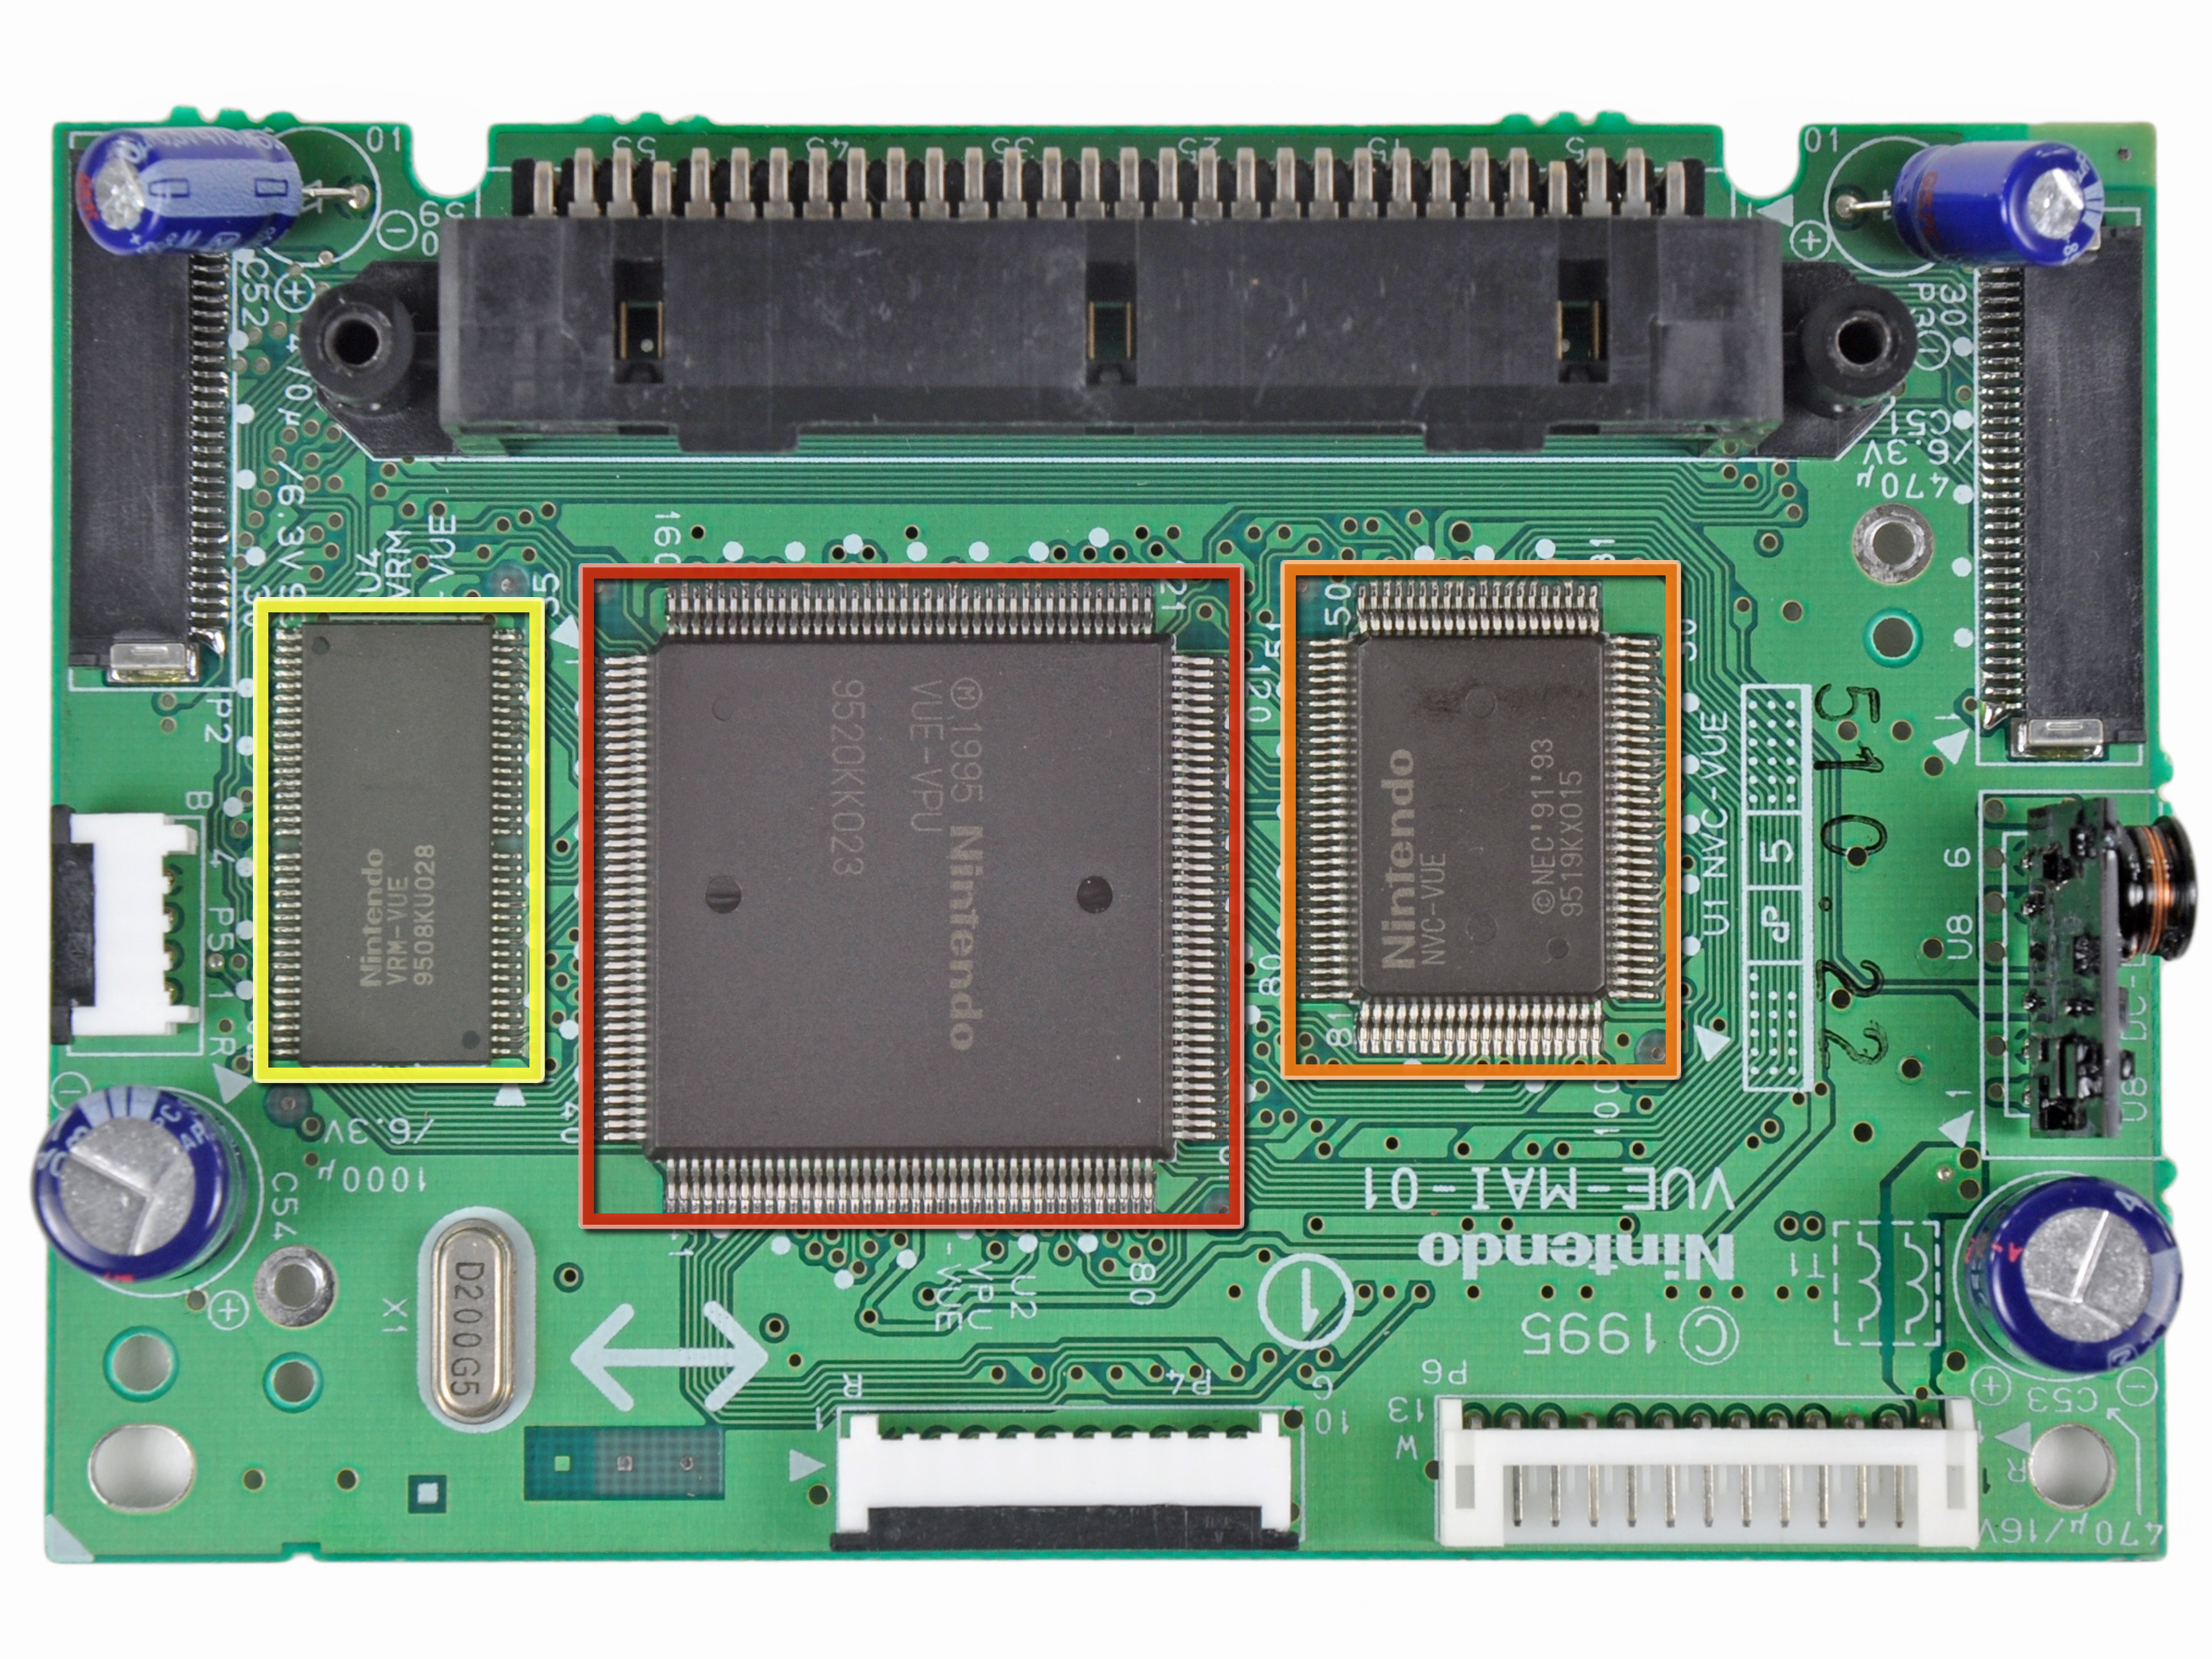
DogP
Okay… IMO, the next step would be to see if you have +5V. That regulator is inside the VB on the motherboard (small board sticking up, labeled U8 DC-DC-VUE).
Open the system up, plug your controller in, turn it on, and check whether a dim red light is glowing on the regulator (you might need to be in a dark room to notice).
The pinout of the DC-DC-VUE is:
1-Vin
2-GND
3-PowerGood
4-no pin
5-Vout
6-GND
You should measure the voltage across 1 and 2 to confirm that you still have 8 or so volts. And then across 5 and 6 to see whether you have 5 volts.
DogP